

Wednesday, December 24, 2014
Thursday, July 31, 2014
Changing Course
A new direction, heading down another path. Following the map of my near future, navigated by God's grace. That would be teaching Geography.
geography
noun
How did I get here? Well to make a long story a bit shorter... I homeschool my youngest kids or did, time is flying and one is nearing his AA transfer degree at the technical college and the other will be entering a program for qualified 16 yr. olds or 11th graders at the community college or the technical college next school year. I was their only teacher until they reached middle school age when they received some excellent supplementation in classes I felt they needed at a marvelous home school program ZLO or Zacchaeus Learning Opportunities.
I can't say enough about ZLO. The instructors are wonderful and "get" the home school mentality, my home school mentality. They teach to a high standard not determined by the public school but by the parents and ultimately Our Heavenly Father. This is a loving community of instructors and parents all working to give our children the excellence in education that the freedom from government-controlled education allows.
So off my soap box and on to the story. I had been involved with ZLO as parent support such as study hall monitor, and until recently bookkeeper and administrative assistant. Preparing for my youngest to be moving on, I chose to pass those jobs onto another dedicated parent with younger children and a longer outlook at ZLO. During one of many parent/ instructor chats it was determined that now would be a good time to search out more instructors and add a wider variety of classes. One of the classes that both my boys took was Geography. It was a great class and they both learned so much and enjoyed it too. Disappointingly, the instructor had a change in plans and decided not to come back.
You know what is coming..
 Yup, I had an Aha moment and realized that I could teach that class. I'm almost always surrounded by maps of all kinds and love knowing where and why events happen around the globe. The previous teacher passed on a wonderfully challenging curriculum that I will enjoy learning along with the students. I have so much support; I've been gifted tons of maps, several globes (when is one enough?) and great ideas from the other instructors at ZLO. I am so excited to get to know my students and will try to instill a curiosity in them to examine God's creation.
Show me Thy ways, O Lord; teach me Thy paths. Psalm 25:4
So that is the direction I'll be headed this coming school year. Add these titles to my name - geography student/teacher/lover, tour guide, navigator, cartographer, trail guide, explorer, and Zacchaeus Learning Opportunities Instructor.

geography
noun
- the descriptive science dealing with the surface of the earth, its division into continents and countries, and the climate, plants, animals, natural resources, inhabitants, and industries of various divisions.
- the physical features, esp. the surface features, of a region, area, or place
How did I get here? Well to make a long story a bit shorter... I homeschool my youngest kids or did, time is flying and one is nearing his AA transfer degree at the technical college and the other will be entering a program for qualified 16 yr. olds or 11th graders at the community college or the technical college next school year. I was their only teacher until they reached middle school age when they received some excellent supplementation in classes I felt they needed at a marvelous home school program ZLO or Zacchaeus Learning Opportunities.
I can't say enough about ZLO. The instructors are wonderful and "get" the home school mentality, my home school mentality. They teach to a high standard not determined by the public school but by the parents and ultimately Our Heavenly Father. This is a loving community of instructors and parents all working to give our children the excellence in education that the freedom from government-controlled education allows.
So off my soap box and on to the story. I had been involved with ZLO as parent support such as study hall monitor, and until recently bookkeeper and administrative assistant. Preparing for my youngest to be moving on, I chose to pass those jobs onto another dedicated parent with younger children and a longer outlook at ZLO. During one of many parent/ instructor chats it was determined that now would be a good time to search out more instructors and add a wider variety of classes. One of the classes that both my boys took was Geography. It was a great class and they both learned so much and enjoyed it too. Disappointingly, the instructor had a change in plans and decided not to come back.
You know what is coming..
Yup, I had an Aha moment and realized that I could teach that class. I'm almost always surrounded by maps of all kinds and love knowing where and why events happen around the globe. The previous teacher passed on a wonderfully challenging curriculum that I will enjoy learning along with the students. I have so much support; I've been gifted tons of maps, several globes (when is one enough?) and great ideas from the other instructors at ZLO. I am so excited to get to know my students and will try to instill a curiosity in them to examine God's creation.Show me Thy ways, O Lord; teach me Thy paths. Psalm 25:4
So that is the direction I'll be headed this coming school year. Add these titles to my name - geography student/teacher/lover, tour guide, navigator, cartographer, trail guide, explorer, and Zacchaeus Learning Opportunities Instructor.
debi
Saturday, May 10, 2014
Sunday, March 30, 2014
It's Almost April
It's true April brings showers. Here in the PNW that's not really a reason to get excited, every month some sort of wet stuff leaks from on high.
What is exciting is that April brings longer days, warmer weather and all manner of new life. It also ushers in my spring cleaning and yard clean up. Must wash those windows to see and appreciate the spruced up yard, right?

It never fails, every April I start thinking ROAD TRIP!! Not happening soon, but this collection of road trip destinations makes me want to start packing.
What is exciting is that April brings longer days, warmer weather and all manner of new life. It also ushers in my spring cleaning and yard clean up. Must wash those windows to see and appreciate the spruced up yard, right?
It never fails, every April I start thinking ROAD TRIP!! Not happening soon, but this collection of road trip destinations makes me want to start packing.
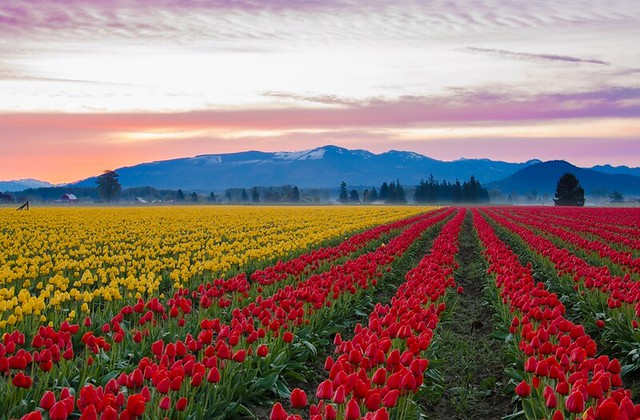
This gorgeous photo immediately caught my eye. Blessed to live in Washington State, this is a few hour there and back road trip. There are other ideas a bit farther away but doable...dreaming.
The beauty of God's creation is just out your freshly washed window or a short drive away.
The beauty of God's creation is just out your freshly washed window or a short drive away.
Wednesday, March 19, 2014

Thursday, October 18, 2012

Wednesday, October 17, 2012
Chocolate chip quinoa cookies
Attention!!! Grandchildren approved!
Recipe: Chocolate chip quinoa cookies
Recipe: Chocolate chip quinoa cookies
"Must Have Been Something I Ate" by Peggy Kotsopoulos
Ingredients
1 cup cooked quinoa
1 cup uncooked quinoa flakes (or oatmeal flakes)
1 cup unsweetened, shredded coconut
2 tablespoons almond butter
4 large VERY RIPE bananas
1/2 cup coconut sugar
1 teaspoon vanilla
1/2 cup chocolate chips
Pinch sea salt
Ingredients
1 cup cooked quinoa
1 cup uncooked quinoa flakes (or oatmeal flakes)
1 cup unsweetened, shredded coconut
2 tablespoons almond butter
4 large VERY RIPE bananas
1/2 cup coconut sugar
1 teaspoon vanilla
1/2 cup chocolate chips
Pinch sea salt
These cookies are SOOO GOOD! The are jam-packed with protein, fiber, stress-busting B-vitamins, energizing goodness and deliciousness! They're also gluten-free and will kick your cravings to the curb.
To prepare the cookies:
To prepare the cookies:
Pre-heat oven to 375 degrees. In a large mixing bowl, mash bananas in bowl with a fork and add vanilla, almond butter and coconut sugar. Add quinoa, oatmeal, coconut and pinch of salt. Mix until well combined. Stir in chocolate chips. Line baking sheet with parchment paper and drop batter on to cooking sheet. Bake for 25-30 minutes. Remove from oven and let cool.
Makes about 25 cookies that look more like muffin-tops and are chewy.
Makes about 25 cookies that look more like muffin-tops and are chewy.
Daughter sent this with these recommendations: "I substituted gluten free oats for the quinoa flakes, applesauce for the coconut sugar and I am sure used way more than 1/2 cup of choc chips, it just didn't look like enough for me ;)"
Wednesday, August 8, 2012
to feed my addiction
YUM!!
Anyone that knows me, know that I am addicted to marshmallows, especially STALE marshmallows. I never get that rare treat cause they never last long enough to get that wonderful crunchy texture. (I know I'm weird, so don't mention it). This recipe says it makes 96 1-inch cubes. I like the giant ones, can anyone do the math? How many 2-inch cubes will I get from this recipe?

These homemade marshmallows are not only easy to make, they set as perfectly as promised: puffed and lightweight, bouncing off one another as I tossed them in the container. Even better, they toasted like a campfire charm speared on the end of a skewer, and s’mooshed between two graham crackers with a square of chocolate.
Makes about 96 1-inch cubed marshmallows
About 1 cup confectioners’ sugar
3 1/2 envelopes (2 tablespoons plus 2 1/2 teaspoons) unflavored gelatin
1 cup cold water, divided
2 cups granulated sugar (cane sugar worked just fine)
1/2 cup light corn syrup
1/4 teaspoon salt
2 large egg whites or reconstituted powdered egg whites
1 tablespoon vanilla (alternately: 1/2 of a scraped vanilla bean, 2 teaspoons almond or mint extract or maybe even some food coloring for tinting)
3 1/2 envelopes (2 tablespoons plus 2 1/2 teaspoons) unflavored gelatin
1 cup cold water, divided
2 cups granulated sugar (cane sugar worked just fine)
1/2 cup light corn syrup
1/4 teaspoon salt
2 large egg whites or reconstituted powdered egg whites
1 tablespoon vanilla (alternately: 1/2 of a scraped vanilla bean, 2 teaspoons almond or mint extract or maybe even some food coloring for tinting)
Oil bottom and sides of a 13- by 9- by 2-inch rectangular metal baking pan and dust bottom and sides with some confectioners’ sugar.
In bowl of a standing electric mixer or in a large bowl sprinkle gelatin over 1/2 cup cold cold water, and let stand to soften.
In a 3-quart heavy saucepan cook granulated sugar, corn syrup, second 1/2 cup of cold water, and salt over low heat, stirring with a wooden spoon, until sugar is dissolved. Increase heat to moderate and boil mixture, without stirring, until a candy or digital thermometer registers 240°F, about 12 minutes. Remove pan from heat and pour sugar mixture over gelatin mixture, stirring until gelatin is dissolved.
With standing or a hand-held electric mixer beat mixture on high speed until white, thick, and nearly tripled in volume, about six minutes if using standing mixer or about 10 minutes if using hand-held mixer. (Some reviewers felt this took even longer with a hand mixer, but still eventually whipped up nicely.)
In separate medium bowl with cleaned beaters beat egg whites (or reconstituted powdered whites) until they just hold stiff peaks. Beat whites and vanilla (or your choice of flavoring) into sugar mixture until just combined. Pour mixture into baking pan and don’t fret if you don’t get it all out (learning from my mess of a first round). Sift 1/4 cup confectioners sugar evenly over top. Chill marshmallow, uncovered, until firm, at least three hours, and up to one day.
Run a thin knife around edges of pan and invert pan onto a large cutting board. Lifting up one corner of inverted pan, with fingers loosen marshmallow and ease onto cutting board. With a large knife trim edges of marshmallow and cut marshmallow into roughly one-inch cubes. (An oiled pizza cutter works well here too.) Sift remaining confectioners’ sugar back into your now-empty baking pan, and roll the marshmallows through it, on all six sides, before shaking off the excess and packing them away.
Do ahead: Marshmallows keep in an airtight container at cool room temperature 1 week.
Tuesday, January 3, 2012
for you
"Today may there be peace within. May you trust that you are exactly where you are meant to be. May you not forget the infinite possibilities that are born of faith in yourself and others. May you use the gifts that you have received, and pass on the love that has been given to you. May you be content with yourself just the way you are. Let this knowledge settle into your bones, and allow your soul the freedom to sing, dance, praise and love. It is there for each and every one of us."
Unknown
Unknown
Wednesday, November 30, 2011

Sunday, June 26, 2011
Side to die for

I love, love, love avocados, but it never occured to me to cook them let alone FRY them. This recipe is Awesome!!
Avocado Fries
Courtesy of Karly at "Buns in My Oven""
Avocado Fries recipe from Dine & Dish
2 firm-ripe avocados, sliced into 1/2 inch thick wedges
canola oil for frying
1/4 cup flour
1/4 teaspoon kosher salt
2 large eggs, beaten
1 1/4 cups panko
Pour oil to a depth of 1 1/2 inches in a medium skillet. Heat oil to 375 degrees.
Pour the flour and salt into a shallow dish. Add the eggs to another shallow dish, and the panko crumbs to a third dish.
Dredge the avocado wedges in the flour, then the eggs, and finally the panko. Fry in batches for 30 to 60 seconds, turning over halfway through. Drain on a paper towel lined plate. Place on a baking sheet in a 200 degree oven to keep warm while frying the rest of the avocados. Season with more salt to taste.
Monday, April 25, 2011
THE way to walk down the aisle
Oh yeah, I would definitely get up at 1 am to watch the Royal Wedding if it was going to be this entertaining!
Sunday, April 10, 2011
Tuesday, April 5, 2011
Update on Barn For Sale
I knew I should have done the research on the barn for sale with the fixer up house. I found out after a click or two that the 3 acre property features a 5378 sq.ft. newer custom home (behind the barn) the barn and no mention of the fixer upper house even though there was a picture. Listed for $969,000, it is no longer on my wish list.
See original post at http://debisphotoblog.blogspot.com/2011/04/for-sale.html
See original post at http://debisphotoblog.blogspot.com/2011/04/for-sale.html
Saturday, March 26, 2011
tried it loved it
today is a perfect day for this recipe, copied it from one of my favorite blogs The Pioneer Woman
Creamy Chicken Spaghetti Casserole
Prep Time: 45 Minutes | Cook Time: 30 Minutes | Difficulty: Easy | Servings: 8
Ingredients
1 whole Cut Up Fryer Chicken
1 stick 1/2 Cup Butter
16 ounces, weight White Mushrooms, Sliced
¼ cups Dry White Wine
Kosher Salt And Pepper
¼ cups Flour
2 cups Chicken Broth (reserved From Chicken Or Canned)
1-½ cup Whole Milk
¼ cups (additional) Dry White Wine
1 cup Freshly Grated Parmesan Cheese
1 cup Whole Black Olives, Chopped
1 teaspoon Kosher Salt, Or To Taste
Freshly Ground Black Pepper
Extra Cheese, For Sprinkling
1 pound Thin Spaghetti
Preparation Instructions
Place chicken in a pot of water and boil on medium-low heat for 30 to 40 minutes. Remove chicken from pot and allow to cool slightly. Keep broth in pot.
Melt 2 tablespoons butter in a large skillet. Throw in mushrooms, add 1/4 cup white wine, and sprinkle with salt and pepper. Cook over medium heat for 8 to 10 minutes, or until liquid has totally evaporated. Remove mushrooms from skillet. Set aside.
Bring broth to a boil. Break spaghetti into thirds (shorter pieces). Add spaghetti pieces to boiling broth and cook. Drain when al dente. Remove meat from bones and shred until you have 2-plus cups of shredded chicken.
Return large skillet to medium-low heat. Add 6 tablespoons butter. Sprinkle flour over butter, whisking to combine. Cook for 1 or 2 minutes. Pour in 2 cups broth and whisk to combine. Pour in milk, additional 1/4 cup wine, salt and pepper to taste, then cook and bubble until thick. Turn off heat, add Parmesan cheese, and stir.
Add mushrooms, chicken, and chopped olives. Stir to combine and check seasonings. Add cooked spaghetti and stir.
Turn into a 9 x 13 casserole pan. Bake at 350 degrees or until golden brown and bubbly. Serve with salad and warm, crusty bread.
Friday, March 25, 2011
mama's ride

can you believe it? this is the thing that impressed me the most on my trip to Ikea, a sweet PINK truck in the parking garage. In my house full of men and men in training, this would definitely be mama's truck, no one else would dream of driving it let alone ride as passenger...I can only dream. Do you think the owner has matching boots, purse, earrings? I would.
Tuesday, March 22, 2011
Saturday, March 5, 2011
Journey

Yesterday marked the 39th year anniversary of our journey that I liken to backpacking in the wilderness. Never really knowing where we were headed, but confident the Lord would show us the way. Carrying our baggage on our backs, over hills and through valleys, in the cold, the storms, the heat and sunshine. We've had six young companions join us along the way for a time, some then departed to take their own journey. Looking forward to the rest of the journey, praying for balmy weather, level trails and gentle comaraderie.
Saturday, January 1, 2011
1-1-11
There is something about a repeating number in a date that grabs attention. We will have several this year:
besides today 1-1-11 we will have 1-11-11 and 11-1-11 and 11-11-11. Not to mention 11:11 twice on each date. What will this mean? Probably something to somebody but to me... just a time and date.
besides today 1-1-11 we will have 1-11-11 and 11-1-11 and 11-11-11. Not to mention 11:11 twice on each date. What will this mean? Probably something to somebody but to me... just a time and date.
Thursday, December 30, 2010
Butternut Squash Lasagna with Caramelized Onions
I fell in food love with this at the Skylark Hidden Cafe in Bellingham. Since they wouldn't give me the recipe I found this one and it is pretty darn good too, even if I had to cook it myself.

1 large butternut squash (about 1-1/2 to 2 pounds)
1 tsp. kosher salt or sea salt
1/2 tsp. black pepper
1 Tbsp. butter
3 Tbsp. olive oil, divided
3 medium-to-large yellow onions, sliced into rings
pinch of sugar
1 pound lasagna noodles (regular, no boil or refrigerated)
1 cup part-skim ricotta cheese
1/4 tsp. nutmeg
1/4 cup unsalted butter
1/4 cup all-purpose unbleached flour
2 cups 2% milk, heated in the microwave 1-2 minutes until warm, but not boiling
1 cup grated Parmesan cheese
1/2 cup part-skim mozzarella cheese, shredded

Preheat oven to 400 degrees F.
Peel butternut squash, slice in half and scoop out the seeds. Cut into 1-inch chunks. Toss
squash with 1 Tbsp. olive oil, kosher salt and black pepper. Spread out in an even layer on a
half sheet pan or a Mario Batali pizza pan if you have one (the Batali pan
is an excellent tool for roasting vegetables). Roast 35-45 minutes, turning once or twice, until
butternut squash is browned and fork-tender. Remove from oven and turn the oven temperature
down to 350 degrees.
Meanwhile, heat butter and olive oil in a large skillet over medium-high heat. Add onions and
saute 1-2 minutes until the onions start to soften. Add the pinch of sugar and reduce heat to
medium-low. Continue cooking onions until they become very soft and golden brown, stirring
occasionally, about 20 minutes. Set aside.
If you're using regular lasagna noodles, prepare them according to package directions. Drain,
but do not rinse.

In a 3 quart saucepan, heat the butter over medium heat. Whisk in the flour and cook 2 minutes. Add the milk all at once, whisking constantly to avoid lumps. Bring to a boil, then reduce heat to a simmer. Let the sauce cook about 5 minutes, until it coats the back of a spoon. Transfer the butternut squash to a food processor. Add the ricotta cheese and nutmeg. Process until smooth.
To assemble the lasagna, spray a 9 x 13 pan with nonstick cooking spray. Place about 1/4 cup of the white sauce on the bottom of the pan. Top with enough lasagna noodles to cover (it doesn't matter if you have to cut the noodles to fit). Top with half of the caramelized onions, then half of the butternut squash mixture and 1/2 cup of Parmesan cheese. Top with another layer of sauce, then the noodles, the remaining caramelized onions, butternut squash mixture and the rest of the Parmesan cheese. Finish off with a layer of noodles, the rest of the sauce and the mozzarella  cheese. Cover with aluminum foil and bake 1 hour. Remove the foil and bake another 15 minutes. Allow the lasagna to rest at least 20 minutes (30 minutes is even better) before serving.
Serves 10.
Per serving: 441 calories, 22 g fat (11 g saturated), 83 mg cholesterol, 41 g carbohydrate, 2 g fiber, 22 g protein, 131% Vitamin A, 24% Vitamin C, 54% calcium, 14 % iron

Read more at Suite101: Butternut Squash Lasagna: A vegetarian lasagna recipe that's worthy
of serving to company.link to original recipe
Subscribe to:
Posts (Atom)
